Subscribe now to receive up to date ideas and products!

How to make a Halloween chalkboard sign that pops!
🎃✨ Looking for a fun and affordable way to decorate for Halloween? In this DIY tutorial, I’ll show you how to create a Halloween chalkboard sign that looks professional but is super easy to make. You’ll learn how to sketch your design with regular chalk first (so mistakes are easy to fix!) and then trace over it with a chalkboard marker for bold, crisp lines. Perfect for porches, mantels, or party décor, this project is simple, stylish, and completely customizable. Whether you go spooky, cute, or classic, this step-by-step guide will help you design a Halloween chalkboard sign that’s reusable and Instagram-worthy. 👻🕸️
3 min read
How to Make a Halloween Chalkboard Sign (Easy DIY)
This post may contain affiliate links. That means if you click and make a purchase, I may earn a small commission at no extra cost to you. I only recommend products I love and think you’ll enjoy too!
Halloween décor doesn’t have to be expensive or complicated — sometimes the most charming touches are the ones you make yourself! A chalkboard sign is a fun, reusable way to add spooky style to your home, porch, or party. The trick? Start with regular chalk to outline your design, then trace over it with a chalkboard marker for bold, lasting lines.
Here’s a step-by-step guide to create your own festive chalkboard sign.
What You’ll Need
Chalkboard (any size that fits your space but I prefer this or this)
Regular white chalk
Chalkboard marker (white or color)
Damp cloth or paper towel (for touch-ups)
Optional: Stencils for lettering or designs
Step 1: Plan Your Design
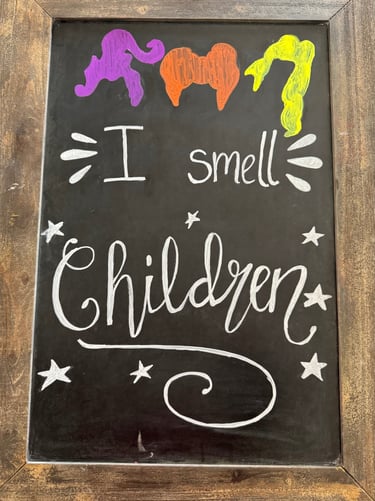
Before you touch the chalkboard, sketch out your design idea on paper. Popular Halloween phrases include:
Trick or Treat
Spooky Vibes Only
Welcome, Ghouls & Goblins
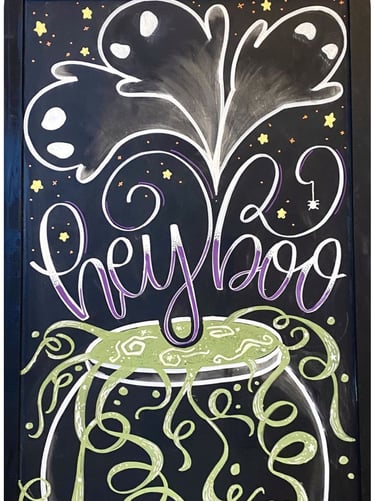
Hey Boo!
Happy Halloween
Add accents like bats, pumpkins, spiderwebs, or ghosts to make it festive. Just a rough sketch for now will do. This is just to help you figure out text styles and accent placement.
Step 2: Outline with Regular Chalk
Using regular chalk, lightly sketch your lettering and illustrations directly on the board. There is no better chalk than Fulltouch. It's all I used as a teacher and its great for at home projects.
Don’t worry if it looks dusty or uneven — this is just your guide.
If you make a mistake, simply wipe with a dry cloth and re-sketch.
As you work through this, double check spacing and alignment to make sure it's looking how you want it.
Step 3: Trace with Chalkboard Marker
Once you’re happy with the outline, go over your design with a chalkboard marker. These are some of my favorite because they have a good variety of colors and have both the rounded or chisel tip.
Markers create bold, crisp lines that are easier to read from a distance and using a variety of colors will really make your design pop.
Take your time with lettering for clean edges. I usually start to thicken my lines at this point to make sure they stand out. You can also add white or another color to add a shadow effect.
For extra dimension, fill in large areas with your accents and other details.
Step 4: Add Details & Clean Up
Make sure to wait until your chalk marker has dried to clean up the regular chalk base. One the marker has dried, you can easily wipe away your initial chalk sketch.
Use regular chalk for shading or “dusty” effects (like a smoky background).
Layer in color markers (orange, purple, green) for extra Halloween flair.
Step 5: Display Your Sign
Place your chalkboard sign on your porch, mantel, or party table. Pair it with pumpkins, candles, or string lights for the ultimate Halloween vibe. See my other blog post on how to use your chalkboard sign to create high impact in a small space.
Final Tips
Chalkboard markers can be more permanent than chalk — test a small corner first to make sure they erase well on your board. I often can fully wipe away with just a wet paper towel, but sometimes I use dry erase cleaner to get the background completely fresh.
Layering chalk markers in both color and white gives your design depth and texture.
Swap out your design after Halloween and reuse the chalkboard for Thanksgiving or Christmas!
✨ A DIY chalkboard sign is a quick project that looks professional and adds that personal, handmade charm to your Halloween décor. With just chalk and markers, you can create a sign that’s spooky, stylish, and totally Instagram-worthy.
For more design inspiration, check out my full website at kchancedesignstudio.com